- 30 August 2024
- LiteManager 5.2 Two-factor authentication
-
Two-factor authentication (authorization) on the LM server using an LM code via email, via your personal SMTP server. New console app for Linux (daemon).
- 05 August 2022
- LiteManager update 5
-
NOIP authorization on LM Server. (NOIP as the central authorization server)
Managing LM Server settings on NOIP. (SSC NOIP) - 21 October 2021
- A new website design LiteManager.org
-
Litemanager — remote support software
- 31 May 2015
- LiteManager remote access tools
-
Free remote access over the Internet with IP or ID connection. QuickSupport mode works without installation for Windows. Demonstration and online Presentation.
Server and Viewer installation
1. LiteManager consists of two main modules: Viewer and Server.
The program’s server module Server is designed for installation on a remote computer, to which you want to get access.
The client module Viewer is installed on a local computer of the administrator or manager. It is the computer that allows to remotely control computers.
You can download the latest version of the program (full or free versions) from the main page of the website Litemanager.ru. Client module is called LiteManager Pro – Viewer and server module is called LiteManager Pro – Server.
2. Installation and basic configuration of the program’s server module Server.
Start the installation process for the server module from the LiteManager Pro — Server.msi file.
Accept the user license agreement.
Choose the folder, where the program will be installed, or use the default folder.
The program will offer automatic integration with the system firewall.
Now you can start the process of direct installation and copying program files on the local computer. During installation the system may ask you for permission to make changes to the system (you should allow these actions). 
At the final stage, a program security window will be displayed, where you should specify security settings. Start with setting a password for access to this Litemanager server, press «Change password» button and enter the password (at least 8 symbols). 
At the end, installation complete window will appear to offer you launch the program.
After you launch the program, the Litemanager icon will appear in the bottom-right corner, near the clock. Now, in order to connect to this computer, you have to know its IP address and access password that you specified in the security settings.
3. Installation and configuration of the client module Viewer.
Start the installation process for the client module from the LiteManager Pro — Viewer.msi file.
Accept the user license agreement.
Choose a destination folder for the program.
Start the direct process of installation and copying program files on the local computer. When system messages appear, allow the program to make changes.
Upon completion of the installation, you will be offered to launch the program.
The main window of Litemanager Viewer is used for remote control of computers, where the program’s server module is installed.
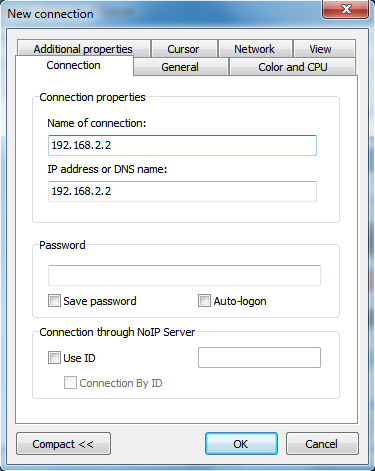
You should add new connection. You can do it from the program main menu, context menu of the connection list and from the toolbar.
In the IP address or DNS name field, specify the IP address of the remote computer, where the server module of the program was earlier installed.
A new connection will be added to the main list. Now you can connect to the remote computer.
During connection the window for entering the password will appear. Enter the password for access to the program’s server module, which you specified earlier.

4 Additional help information
About the program
Before installation
Program installation
Creating a new connection

