
- 05 January 2024
- LiteManager 5.1 for Linux, Mac OS, Android with inbuilt LM Server and NOIP.
-
Control remotely your Linux and Mac, available remote screen and files modes. Android screen in view only mode.Built-in NOIP for Linux.
- 05 August 2022
- LiteManager update 5
-
NOIP authorization on LM Server. (NOIP as the central authorization server)
Managing LM Server settings on NOIP. (SSC NOIP) - 21 October 2021
- A new website design LiteManager.org
-
Litemanager — remote support software
- 31 May 2015
- LiteManager remote access tools
-
Free remote access over the Internet with IP or ID connection. QuickSupport mode works without installation for Windows. Demonstration and online Presentation.
LiteManager: remote access to a desktop via the Internet or LAN
It often occurs necessary to connect to a remote computer, what for example is at home or at work. For this problem’s solution there are remote access programs, what offer full control over the other computer. One of such programs is LiteManager, light and swift, available in two versions: a full (Pro) and a free one (Free).
LiteManager consists of two main components: Viewer module, which is to control and Server module which is to be set up on a remote computer and to enable controlling.
You can download the modules Viewer and Server which don’t need to be set up as two executable components (ROMViewer.exe and ROMServer.exe) from the official website. Otherwise you can download an archive with two installation MSI files of Viewer and Server, which contain executable files of the client and the server modules in accordance and additional program components for either system service or expanded working features launching.
When the server module is launching, the dialogue window will be open and show the ID and the password necessary to access the computer with the help of the client application Viewer.

When launching the client module Viewer, you’ll be suggested imputing the remote computer’s ID and connecting it.

After the connection the program will suggest that you impute the access password generated when the server module was installing.

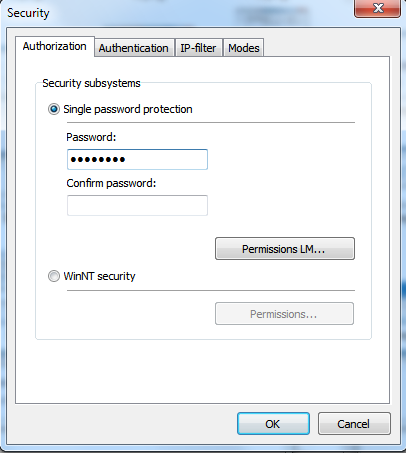
You can set up the program from MSI distribution. To set up the client module Viewer you need just to accept the license agreement and enter the installation’s path. After been set up the program will get fully localized interface and additional components will be available. During setting up the server module will be automatically added to the system’s firewall exclusions and launched as system service. It is also necessary to specify an access password and if essential expanded security settings.
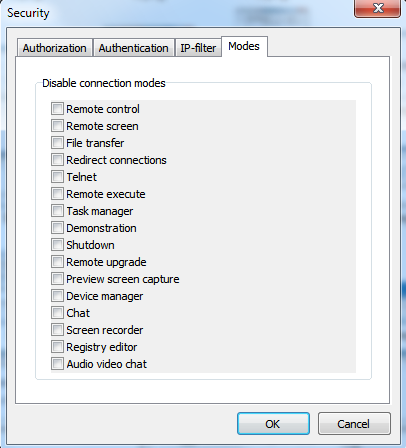
The working modes can be switched off in the item «Modes».
Instead of password impute you can use the security system WinNT. It will let you authorize on a computer without using any password, but with the help of Windows users’ accounts.

The connection to the server module can be implemented using the computer’s IP address, if you choose in the main menu of the client module Viewer the item «Connection», then «Quick Connection via IP» or the item «Add» the connection settings are expanded.


To the main connection list you can add any quantity of computers, divide them into groups and sort out.

10 modes of work are available in the program. For example remote desktop control with lock-screen and control functions, files relocating directly to a remote desktop and back (Drag&Drop), recording of a control session, switching between remote users and terminal sessions.
There is a mode allowing viewing, copying, deleting and launching files either on a remote computer or on a local one. The power control mode lets put off or reboot a computer.

The remote task manager, the register editor, the text or audio- video- chat, the simple message dispatch, programs launching, the command line (Telnet), the inventory and so on are also available in the program.
There is a mode of screen recording on the schedule that allows the server module saving a desktop screenshots in specified intervals, then you can connect up and review them. The main thing is that recording goes independently from the client module Viewer, so you can get first-hand information what was happening on the computer during the day.

To install LiteManager on the big amount of computers inside of a corporate network the remote setup and the computers search module are available.
With the help of the search you can automatically find the computers you need using specified IP addresses range with checking of the presence the program’s server module installed on them. Then after this, you can add all the found computers to the main connections list.
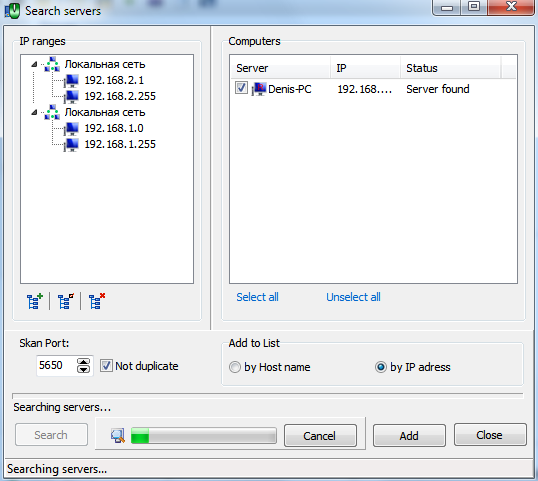
After adding the computers to the connections list you can find there hasn’t been installed the server module on them, so you can try to set it up remotely with the help of built-in remote installation capability of LiteManager.
The remote setup allows installing or updating the server module on a remote computer. In case of updating all the settings of the server module will be saved, but if the server is being installed for the first time you need to generate a distribution and specify all the necessary security settings, for example an access password in advance.
Let’s step-by-step take up a remote installation process. To begin with, we prepare a server distribution with the help of the built-in configurator. To do this, we launch Viewer on administrator’s rights, otherwise the settings won’t be saved.
You do tick off «Remote Setup – MSI Configurator» in the main Viewer’s menu.

Then we enter the path to the server distribution and configure it, which means we specify the settings necessary for us. Optionally, if the server is already installed on your computer you can use its settings. After the configuration we launch the remote installation and choose in the main computers list a required connection or connections and through the context menu launch the remote installation mode.

In the appeared window the list of chosen connections on which the installation will be implemented, a field for the server’s distribution specifying and an authorization type Windows NT are shown. If you chose LiteManager authorization the program will try to authorize on the already installed server, which means LiteManager authorization will suit only for updating of the already installed before server.
After the installation launching you will be suggested to authorize with the help of the security system Windows NT. In the appeared window on a remote computer you need to enter the user’s name and password on the administrator’s rights.

If the computer is in the domain you can submit the domain’s administrator.
It’s worth to take a notice of that for a successful authorization Windows NT security system claims the user to have a password as compulsory. It won’t work with an empty password.
After the successful installation you can connect to the remote computer.
In the domain the server mode can be deployed with the help of Windows group policies. The default server settings are stored in the register’s key
HKEY_LOCAL_MACHINE\SYSTEM\LiteManager\v3.4\Server\Parameters.
When the massive server installation with identical settings is on, you can simply import the key with the settings to the register.
The additional plus of LiteManager is presence of the free application NOIP. It is a separate program what allows to link Viewer and Server between each other with the help of ID and without using of an IP address. The especial interest this application will arise in huge organizations with distributed net of offices and departments or in companies those are engaged in technical support of remote clients.
NOIP application is supplied together with the client module Viewer and is set up together with it in the same catalogue by the name of LMNoIpServer.exe.
For work NOIP needs a computer with a permanent public IP address in the Internet if it is supposed to work via the Internet or a local address if the work is going to take place in a corporate network.

Let’s launch NOIP with default parameters. If it is necessary in the main item you can change the program port or set the max number of working clients.
After the launching of NOIP it is necessary to mark in the client module Viewer and to the server module Server that a connection via ID will be set up through your own NOIP.
It can be done in the settings of connections via ID in the item «Options». Open a connection via ID in the client Module Viewer you can in the main program menu «Connection – Connection via ID»

Open a connection via ID of the program server module you can using the context menu the server icon or using the menu «Start – The settings of the program LiteManager»

Remove the mark from the point «use shared NOIP» and specify the IP address and the port of your computer, then the only thing left is to connect. In the item «statistics and information of NOIP» you can see set connections and status of NOIP itself. The default type of NOIP is «Licensed» which means that it is only to work with a Pro version of the program.

The type can be changed on Free if it is open for other users in the item additional. Thus you will be able to work with the help of the free version Viewer as well.
This option must be switch on before launching NOIP. After the opening of NOIP other users will be able to work with it and all the data will be transmitted ciphered, while your computer will be a relay only.

Let’s note another interesting feature in the item additional. This is permission to the client module to review the list of the connected servers. When you switch on this setting, Viewer will be able to find available servers on NOIP. To look through the available servers on the client module Viewer you can in the settings of connections via ID, the item «connected servers».

So we get the list of servers and choose one we need for a connection. The settings of our own NOIP for a connection via IP can be specified in advance via the distribution configurator even before the program’s installation. Or if the server module is used in the technical support mode, which means ROMServer.exe launches separately from the whole program, so you can specify settings directly to the file’s name. In the name of the file ROMServer.exe you can enter ID, the password and the IP address and the port of your NOIP. And when launching, the program will set up a connection with specified parameters. For example, let’s try to enter in the server’s name ID 88879, password 1234, IP, the port of our NOIP and launch the program.
ROMServer_88879_1234_127.0.0.1_5651.exe

It’s not necessary to specify all the parameters, you can skip those you don’t need or impute only an ID and a password. The server ROMServer.exe launched without installation as a separate specimen, in as it’s called technical support mode, stores its settings in the other register key HKEY_CURRENT_USER\Software\LiteManager\v3.4\Server\Parameters, and can be launched and work simultaneously with the already installed server module of the program LiteManager.
The server module has a capability of transmitting and storing settings without using the register. All the settings can be stored in the file Config.xml, created in the server catalogue. This file can be created with a fresh start as, for example, an empty text file, or the settings can be exported from the program itself.
Open the server settings, the point «Settings», the item «Additional» and choose the action «export the settings to an XML file» or cancel the tick «compact version». In this case a configuration file will be automatically created in the server catalogue.

The more thorough description of the available working modes and the program’s features you can find on the official website LiteManager in the sections OnLine help and Knowledge Base.
LiteManager is available in two editions: a full – Pro, with all the features and $10 by cost and a free one – Free, allowing controlling 30 computers either to private persons or to commercial organizations.