- 30 August 2024
- LiteManager 5.2 Two-factor authentication
-
Two-factor authentication (authorization) on the LM server using an LM code via email, via your personal SMTP server. New console app for Linux (daemon).
- 05 August 2022
- LiteManager update 5
-
NOIP authorization on LM Server. (NOIP as the central authorization server)
Managing LM Server settings on NOIP. (SSC NOIP) - 21 October 2021
- A new website design LiteManager.org
-
Litemanager — remote support software
- 31 May 2015
- LiteManager remote access tools
-
Free remote access over the Internet with IP or ID connection. QuickSupport mode works without installation for Windows. Demonstration and online Presentation.
Screen recorder
The «Screen recorder» mode allows you to monitor user activity completely independently of ROM-Viewer. It means that the administrator can use the comfortable user interface to specify the schedule that looks like this if you put it in a plain human language — «Make a screenshot every 2 minutes on business days from 8 AM to 5 PM“. At any time the administrator can download the file where screenshots are stored for a certain day from the server and use a special player to see what was going on on the remote computer screen, for example, at 4 PM. It is also possible to protect the screenshot file against being deleted on the server.So, who may need it? First of all, administrators and directors because it allows them to control the user activity. Watching through a daily report with screenshots made with one-minute interval, you can see what exactly was going on on the remote computer screen throughout the entire business day. Thus, it is possible to considerably optimize the work of employees even when the administrator is not at work.
If some statistical information is displayed on the remote computer screen (for example, CPU usage, etc.), it will be convenient to use these screenshots to track changes in usage throughout the day, especially at night, which is quite important for server administration. If several users or an unlimited number of users share access to one computer, screenshots may be useful to control their activity.
Downloader
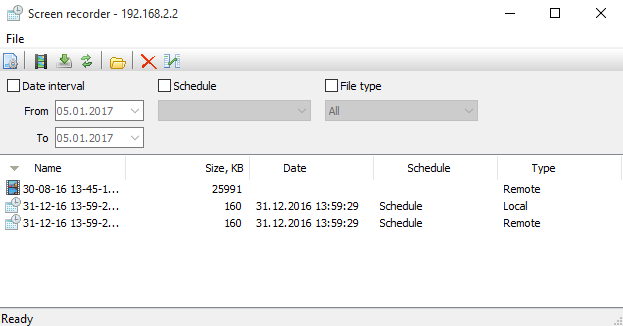
Screen records loader
This window shows the list of files you can view, their size and creation date, the schedule according to which they were created and their types. There are two types of files: local and remote. Remote files are located on the server in the “\LiteManager Server\Record\» folder, local files are located on the computer with ROM-Viewer in the «C:\Documents and Settings\All Users\Application Data\LiteManager Files\Record\» or «C:\ProgramData\LiteManager Files\Record» folder. You can change the name of the file for any other name you find convenient, but the extension of the file must remain. rrf.
To start viewing a file, just double-click its name in the list.
For your convenience you can filter files by date, schedule and location type.
Menu
- Settings. Open the «Screenshot Settings» dialog box. Here you can enable/disable screenshots, specify the screenshot interval, etc.
- View file. Open the selected file in the viewer. If it is remote, it is downloaded to ROM-Viewer over the network.
- Download file. Copy the remote file to the local drive and then it appears in the list of local files.
- Refresh. Refresh the list of local and remote files.
- Open file. Open the dialog box where you can select any other. rrf file to view it.
- Delete. Delete the selected file.
- Download all files. Download all remote files to the local computer except for the file currently used for making screenshots.
Settings dialog box
General
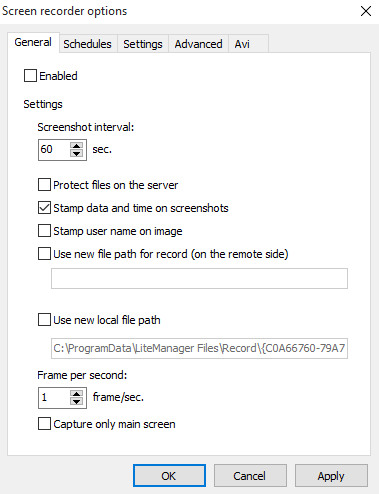
General options
- Enabled. Select the checkbox to enable making screenshots.
- Screenshot interval. Specify the interval to make screenshots at. It is not recommended to specify a too short interval (for example, 1 second) because it may lead to heavy CPU usage and screenshots can quickly occupy free space on the hard drive.
- Protect files on the server. Protect screenshot files on the remote server from being deleted.
- Stamp data and time on screenshots. The date and time when the screenshot was created will be shown on it.
- Stamp user name on image. The user name will be shown on screenshot.
- Use new file path for records (on the remote side), specify a new folder for screen record files on the remote PC.
- Use new local file path, specify a new folder for local files.
- Frame per second, if screenshot interval is 1 second, set the FPS value.
- Capture only main screen, If you have multiple screens, capture only main screen.
Schedules
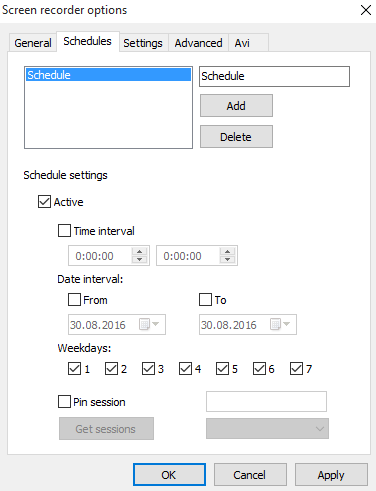
Schedules options.
Here you can configure the schedule the program will use to make screenshots. By default, one active schedule is created.
For your convenience you can create several schedules.
- Active. Enable/disable the schedule.
- Time interval. Specify the time when to start and stop making screenshots.
- Date interval. Specify the date when to start and stop making screenshots.
- Weekdays. Specify the weekdays when screenshots will be made.
Pin session — for each schedule you can pin the session, the user session that is necessary for recording on a terminal server.
Settings
Since screenshots may be made for quite a while, files will occupy a lot of disk space. To avoid problems, you can specify the compression rate and limit the size of created files.
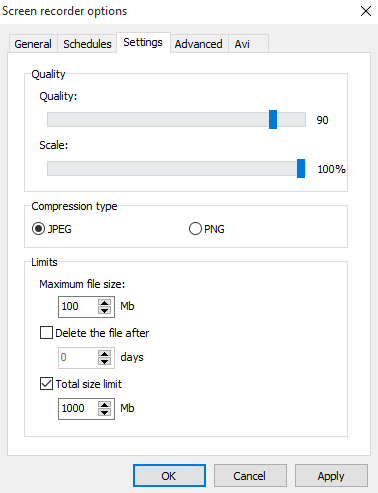
- Quality. Specify the JPEG algorithm compression rate.
- Scale. Reduce the size of the screenshot proportionally.
- Compression type. JPEG or PNG.
- File size limit. Limit the maximum size of the screenshot file to make sending it over the network and viewing it more convenient.
- Delete the file after. Specify the interval to automatically clear the files after their creation.
- Total file size. Limit the size of all screenshot files on the disk.
Settings options.
Advanced
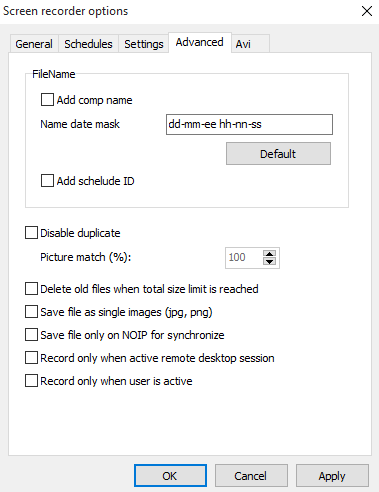
Advanced options.
- Add comp. name — adds the computer name to the name of the record file.
- Add schedule ID — adds schedule ID to the name of the record file.
- Disable duplicate — an algorithm which removes repeated consecutive frames, indicating the degree of compliance 100% means that two consecutive identical frame will not be written. Function is useful to reduce the file size of the recording when the computer is idle.
- Delete old files when total size limit is reached — delete oldest files when limit is reached.
- Safe file as single images (jpg, png) — save screenshots as simple images.
- Save file only on NOIP for synchronize — locally the record is not stored on disk, only on NOIP.
- Record only when active remote desktop session — allows you to take screenshots of the screen during remote session so you can record the actions of remote users when connected to the computer screen.
- Record only when user is active — allows you to take screenshots of the screen only when the mouse is active, if in a few minutes the mouse is not active, the recording will stop.
Avi.
Avi tab allows you to enable screen recording in Avi format file, the file is written in the memory of the computer when the time limit reached the data is transferred to disk.
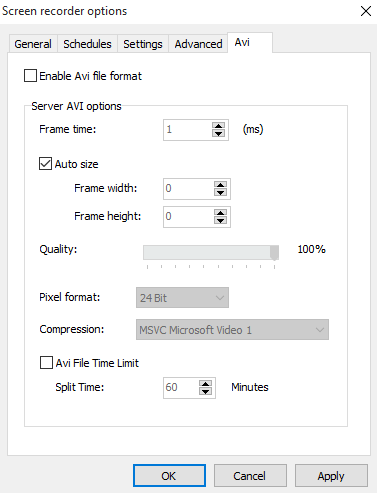
- Frame time — the time between two shots in milliseconds.
- Auto size — the size of the Avi in accordance with the size of the screen. Or you can set the parameters width and height of the Avi.
- Pixel format — e quality of the video palette.
- Compression — codec to compress the Avi data.
- Avi file time limit — a time limit of one Avi file, select the limit duration of a single file.
The player window is similar to a regular video player where you can navigate and export screenshots.
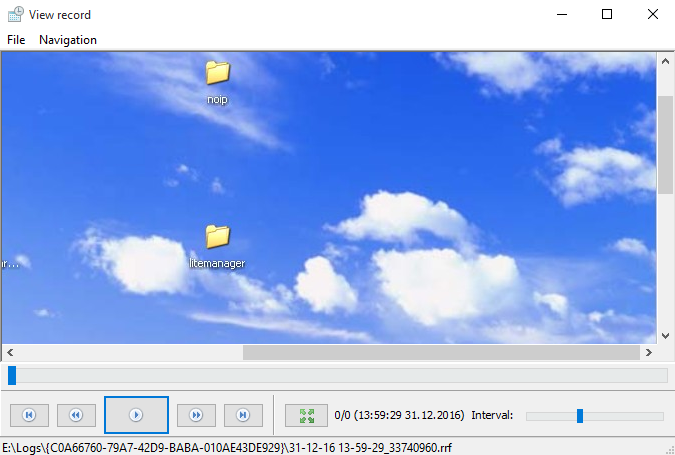
Player
File menu
- Export current frame. Save the current screenshot to the disk.
- Export all frames. Save all screenshots from the current file to the disk.
- Save as. Save the entire screenshot file to the disk.
Navigation
It allows you to move to the previous and next screenshot and also to the first and last screenshots. You can also enter the number of the screenshot you need It is possible to play screenshots at the specified interval and also fit the image to the player window.
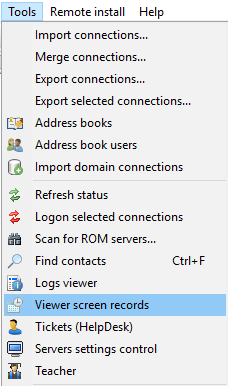
Screen record's viewer separately Viewer — Main menu — tools — Viewer screen records.
