News
- 05 January 2024
- LiteManager 5.1 for Linux, Mac OS, Android with inbuilt LM Server and NOIP.
-
Control remotely your Linux and Mac, available remote screen and files modes. Android screen in view only mode.Built-in NOIP for Linux.
- 05 August 2022
- LiteManager update 5
-
NOIP authorization on LM Server. (NOIP as the central authorization server)
Managing LM Server settings on NOIP. (SSC NOIP) - 21 October 2021
- A new website design LiteManager.org
-
Litemanager — remote support software
- 31 May 2015
- LiteManager remote access tools
-
Free remote access over the Internet with IP or ID connection. QuickSupport mode works without installation for Windows. Demonstration and online Presentation.
LiteManager – Remote Computer Control and Administration
Computers and the Internet global computer network have long been a part of our lives and have become integral. However, many users are far from tech savvy and use their computers only for a limited set of tasks, for example: printing documents, typing texts, and visiting certain Internet websites or social media. For this category of users, any Windows error message, or even a notification about the need to update the system, causes panic and fear of viruses, which sometimes is quite justified. In order to help users to deal with their problems, administrators can use remote administration software, which lets them remotely connect to clients’ computers and provides almost complete control of a remote machine. Such programs are also suitable for home use, to provide assistance to a friend or a family member. The purpose of this course is to familiarize you with the means of remote computer administration using the example of the universal set of remote administration software programs– LiteManager.Course Contents
1. Introduction to the topic: What is remote access?
2. Creating new connections and working with a contacts list.
3. Setting up a server and its parameters.
4. Capabilities of the program in complex networks. Callback, NoIPServer and Cascading.
5. Additional features of LiteManager, remote installation, built-in search, and command line parameters.
1. Introduction to the topic: What is remote access?
Remote access is the option for a user to connect one computer to another and work with the latter remotely. As an administrator, you will be able to see the desktop of a remote computer and perform the necessary actions on it using your mouse and keyboard. When connected, you also get access to other resources, such as the computer’s file system, processes, registry, etc.
In order to explain how the connection is established, we need to define the concept of an IP address. This term is clear for many people and does not require clarification, but for some it's just two Latin characters. An IP address is the address of a computer on the Internet, just like your postal address, but it is represented in the form of numbers such as 192.168.0.1. In order to connect to a computer, you must specify the IP address and port of the program. The port is something similar to the apartment number in the postal address (if you live in an apartment building). For example, the LiteManager port is 5650 by default.
When you connect and work via the Internet, the communication quality plays an important role: the better the quality, the more convenient it is to work. Ideally, the work is performed in real time, so that sometimes you even forget that you are working with a remote computer.
Particular difficulties with connection can be created by NAT firewalls, dynamic IP addressing, and division of the network into sub-networks. Remote control in such conditions is not an easy task, because the computer can be inaccessible through its IP address. In these cases, specific technological solutions have to be implemented in order to connect to this computer. For example you can configure Port-Forwarding, set up a virtual network using Hamachi software, or get a temporary DNS name, but consideration of these solutions is beyond the scope of this training course, and, moreover, LiteManager offers its own solutions to these problems.
LiteManager copes with all tasks and provides remote access to computers in real time. The program consists of two parts: a client module – Viewer -, which should be installed on an administrator's computer, and a server module – Server -, which should be installed on remote computers. Program installation is very simple and does not require additional action. Upon completion of the installation, the server module will prompt you to enter your password which will be used to access this computer via the Viewer client module.
2. Creating new connections and working with a contact list.
This lesson is devoted to working with the LiteManager client module – Viewer -, which should be installed on an administrator's computer to perform remote computer administration. Let’s consider the process of creating a new connection and the available modes of administration.
Adding a new connection in the Viewer client module is very simple.
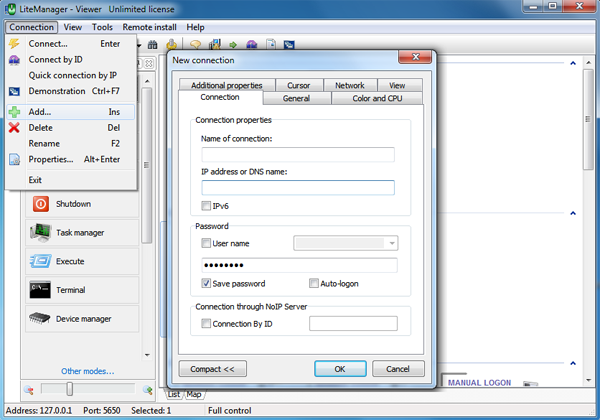
Fig. 1. New connection window.
1. In the main window, select the «Add new connection» option. To do this, choose «Connection — Add» from the main menu, or using the contact list context menu, or by pressing the «Add» button located in the program menu.
2. In the newly appearing window, specify the IP address of a remote computer or its DNS name, specify a connection name (whichever you like), and enter the password to the LiteManager server module.
3. You can also check the «Save password» box to stop being prompted to enter the password each time you connect. The «Auto Logon» checkbox will allow the program to automatically connect to the remote computer when it goes online.
4. After closing the window, the new connection icon will appear in the list.
Connection icons will be displayed differently depending on the state of remote computers. If the connection has «Offline» status, it means that the computer is off or completely unavailable. If the status is «Not Found», it means that the computer is on the network, but the server module of the program is not available. If the connection status is «Locked», it means that the computer and the program’s server module are available and you can connect to it by entering an access password. After entering the password, the connection status will change to «Online», and a small picture of the remote desktop will be displayed.

Fig.2 The main program window with a list of connections.
Now let’s try to connect to a computer using any of the remote access modes.
1. To do this, select the desired mode from the list in the Mode tab and click on the connection in the list. Another way to do this is just selecting a connection mode in the context menu of a connection.
2. If the password for the connection is not specified, a window for entering the password will pop up. If the NTLM authorization is used, a window is shown with username, password and domain input fields. If there is no domain, just leave this field empty.
3. After that, a window of the selected connection mode will appear.
Let's connect using the remote desktop control mode. This connection mode is used in most cases for remote computer administration.
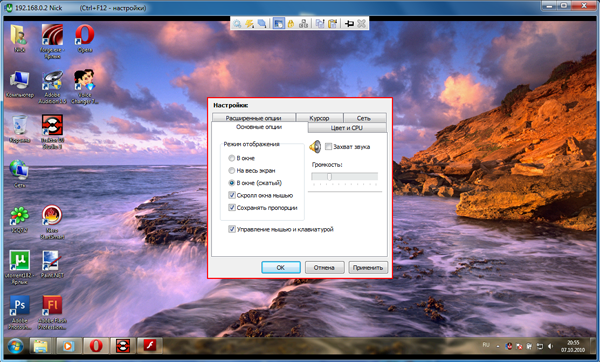
Fig. 3. Remote Desktop window.
Most of the time you'll use this connection mode, so let’s consider the capabilities available in LiteManager for remote desktop control.
At the top of the window is a pop-up panel with the most frequently used functions.
The program settings window has a complete set of options, and their names are self-explanatory, therefore you'll not have any problems to sort it out. Let us note the interception of audio signals of the remote computer, enabling the interception of translucent windows, and traffic saving operation mode, which allows for reducing of network traffic used by the program and is convenient for slow connections.
The remote control window is fully interactive and scalable. You can drag&drop any file right to the desktop of a remote computer and back, and scale the window in case the remote desktop resolution is too big – use the «Windowed» mode.
The program provides about 10 individual remote connection modes with intuitive and easy-to-learn interfaces. Here are the major modes and their brief descriptions:
• File Manager – enables you to view the file system of a remote computer and copy, delete, or launch (open) files. A bookmark system is integrated for quick navigation.
• Task Manager – allows for management of processes and services of a remote computer and viewing information about currently running programs.
• Power Management — enables you to turn off, reboot or turn on a remote computer with the Wake On LAN function.
• Device Manager — generates a report about the installed software and hardware on a remote computer. This mode is not available in the free version.
• Text Chat — enables you to communicate with remote users in chat mode. You can also send single messages to a remote user.
• Terminal – a connection with a command prompt.
• Recording of the remote screen on schedule – allows you to configure the desktop recording of the remote computer to a video file and then watch this video. This function is not available in the free version.
• Registry Editor — allows for connection to the system registry, editing of data, and importing and exporting of registry keys. The free version includes registry viewing only.
• RDP — connection using the standard Windows Remote Desktop Protocol. Not available in the free version.
• Remote Start – starts an application on the remote computer.
For convenience, the list of connections can be displayed as a map. Objects can be placed on the map in any order, and you can add additional objects, such as a printer, a scanner, a modem, etc., and draw connection lines between computers.
Let's draw a simple network map.

Fig. 4. Network map.
1. To open the map, just click the «Map» tab at the bottom of the window.
2. To move a connection, simply left-click it and drag it to the desired position on the map, just like any drag and drop operation.
3. To add a new object to the map, just choose the «Add image» option from the context menu or the map’s main menu. In the newly appearing window, select the desired object and click «OK». The object is now displayed on the map.
4. To add a new image to the gallery, use the «Add new image» option.
5. In order to draw a line between objects, use the context menu and select «Draw a line to…». The mouse pointer will change to a cross. Now click on the second connection on the map to draw a line.
For convenience, there is also a map editing mode. To enable it, choose «Editing mode» from the context menu or the map’s main menu.
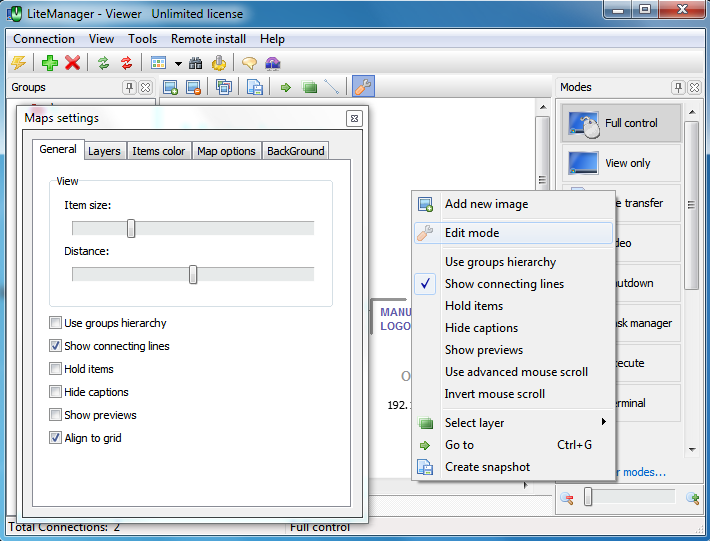
Fig.5. Window editing mode.
Let’s consider the main points.
1. On the 'General' tab there are basic map settings. Here you can change the size of elements, scale the map, or switch the map to display groups so that the map elements would be sorted by groups, as in a basic list. You can fix elements so that they would not be moveable on the map. Other options are also available.
2. The ‘Layers’ tab is used to add layers. All connections are located on the main layer of the map by default. To move an object from one layer to another, select «Move to Layer» from the context menu.
3. In the «Color elements» tab you can select the background color for an object. If you check the «Show frame only» checkbox, a frame of this color will appear around the object.
4. On the «Settings» tab you can set additional map parameters, such as size of the field, «Auto Scroll» when hovering the mouse over the edge of the map, and configure the field grid.
In edit mode, you can separately change the properties of each object. To do so, just select an object and the settings window will appear automatically.
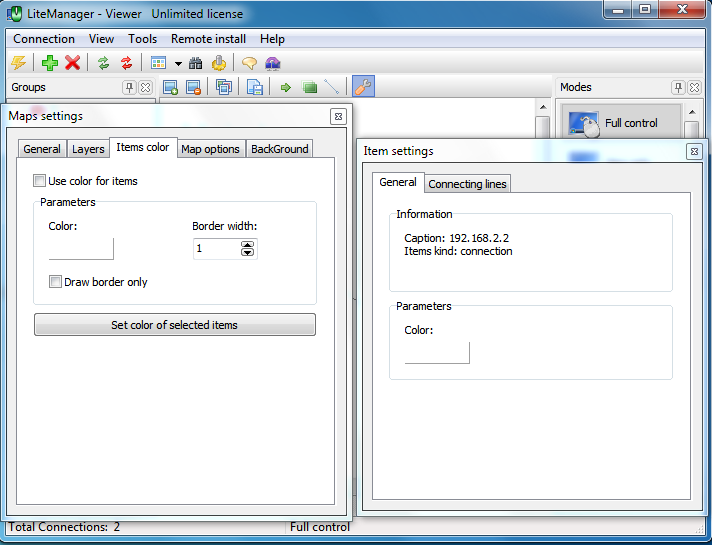
Fig. 6. Map element parameters window.
1. On the ‘General’ tab are general object properties. Here you can change the object color or its representation style.
2. On the «Connections» tab is a list of the lines making up the object and their parameters, like color of the line, its thickness and style.
The purposes of most of the options and settings of the program are clear from their names, but you can find their detailed descriptions in the program’s help system, which can be accessed from the main menu.
3. Setting up and configuring a server.
The previous lesson on LiteManager was devoted to the client module. Let’s now consider the server module of the program.
In the final stage of installation of the server module, you will see a server security settings window, where you will be prompted to enter a server access password. Let’s consider the configuration process in detail.

Fig.7. Configuring server security.
1. The server settings window can be accessed from the context menu of the server, which you can find in the system tray, item «Setting the ROM-server», or from the system menu «Start» – «Applications» – «LiteManager Pro“ – Server», item «Settings for LM-Server».
2. In the server settings window, click on «Server Settings» and choose the «Security» item.
3. In the server security settings window, you will see four tabs: the «Authorization» tab lets you choose the authorization type – «Password» or «WinNT security system». In the first case you just need to enter a password, which should consist of not less than 8 characters. If the server will be accessed from the Internet, you should set a more complex password. If you use WinNT security, choose the users that will be allowed to access the server.
4. On the «Authentication» tab, you can choose the security level. All data in the program is encrypted, so when you work through the Internet it is recommended to set the maximum level.
5. On the «IP-Filter» tab, you can set a filter for IP addresses that are permitted access to the server, or, on the contrary, specify the IP addresses for which access is denied.
6. On the «Modes» tab, you can disable certain modes of access to the server.

Fig. 8. WinNT authentication.
Now let’s consider the general server settings «Options» item.

Fig. 9. Server parameters.
1. Using the «General» tab, you can hide the server icon from the system tray, disable the menu item «Stop ROM-Server», and set server notifications on client connections.
2. On the «Network» tab, you can change the server port and bind it to a particular network interface.
3. On the «Callback» tab, you can enable the automatic callback option and the interval between auto-connections. The callback technology will be considered later.
4. On the «Logging» tab, you can enable the logging of server reports to a file. The file will be created in the server folder, «Logs» subdirectory.
Other server menu items allow you to change the type of server startup (automatic or manual), choose the menu language, and set a password for server configuration.
The last item is «Callback». This is a technology that lets the server connect to the client module, thus allowing the client to control the server. We’ll consider this option in the next lesson.
4. Capabilities of the program operation in complex networks. Callback, NoIPServer and cascading.
In the last lesson, we considered the server set-up and configuration. Let’s now talk about the technological solutions of LiteManager for work in networks with complex structures.
The «Callback» function allows the server to initiate a network connection. This mechanism enables connections to servers that are protected by firewalls, or those with unknown IP-addresses.
To configure the callback, the client and the server modules have to be properly configured.
Configuring the server module of the program.
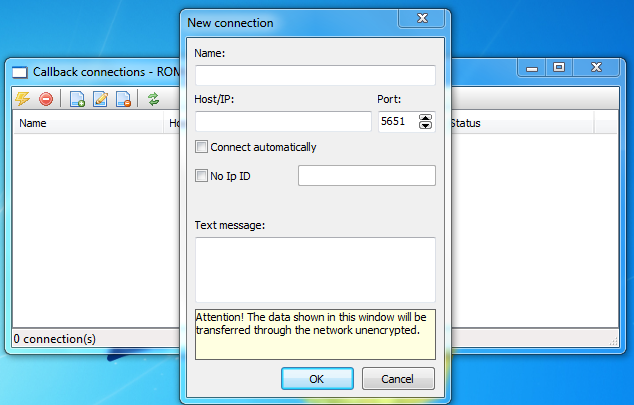
Fig. 10. Callback settings window.
1. Right-click on the server icon next to the system clock. Choose «Callback» from the context menu. The callback management window will appear. This window can also be accessed from the program settings.
2. Click the «Add callback» button on the toolbar to open the new connection parameters window.
3. Specify the IP-address of the ROM-Viewer, write the invitation text for the remote administrator, and press OK.
4. Select the newly created connection from the list and click «Connect».
5. After the administrator confirms the callback from the client application, he or she will be able to connect to the server.
To enable the client module to receive callbacks, turn on the receipt of incoming connections in the settings menu.
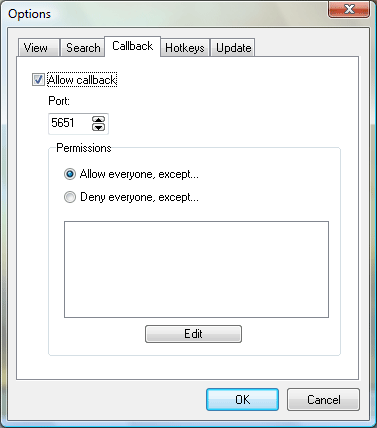
Fig. 11. LiteManager Viewer configuration.
1. Open the client module settings window and choose «Settings» from the main «Tools» menu.
2. Check the «Allow incoming connections» checkbox in the «Callback» tab.
3. In the callback settings, you can also specify the port for incoming connections and edit both black and white lists of IP-addresses of incoming connections.
In order to enable the client module to receive server connections, you must configure the firewall security policy to allow the Viewer to accept incoming network connections. In most cases, you can just add the ROMViewer.exe application to the firewall exceptions list.
To enable the callback you have to specify the IP address of the client module. Sometimes client modules can be inaccessible using their IP addresses or their IP addresses can be unknown. To solve this problem, you can use the NoIPServer application of the LiteManager pack.
NoIPServer is a standalone application that allows you to connect the Viewer and the Server with each other without an IP address, through NAT and other network barriers. Connection is established via ID. NoIPServer is included in the LiteManager pack. The application executable file is LMNoIpServer.exe and you can find it in the LiteManager Viewer installation directory. The application should be launched on a computer which is accessible both by the Viewer and by the Server. You can connect multiple servers and clients in this way.
NoIPServer Configuration
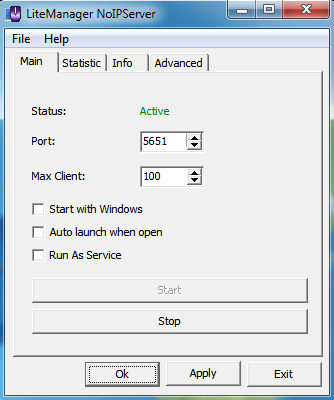
Fig.12. NoIPServer configuration.
1. Run the NoIPServer application from the installation directory or from the Start menu.
2. Launch the Server so that the status would change to «Active».
3. In the application settings, you can select a port, limit the number of servers that can be connected, and configure the IP and ID filters. The Statistics tab displays the connected servers. You can manually terminate connections from here.
4. On the server side, create a new callback with NoIPServer as a Client. Specify its IP and port, and your unique ID. In order to select an ID, check the «No IP ID» checkbox and enter a random ID as a string.
5. On the Viewer client side, create a new connection with NoIPServer as a server. Specify its IP and port. Indicate that you are connecting to the managed server through NoIPServer. To do this, check the «Use ID» checkbox and enter the ID of the server.
6. Now you can connect to the server.
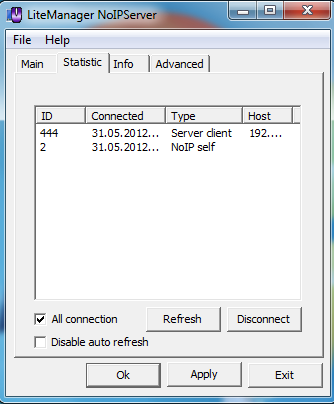
Fig. 13. NoIPServer statistics.
The «Statistics» tab of NoIPServer displays a list of connected servers.
We have considered two useful networking solutions of LiteManager – «Callback» and NoIPServer, but the program has another interesting solution – «Connect via Server».
Modern networks are complex and often divided into segments of small subnets with their own addressing systems. In order to access computers that are located behind a gateway or in another subnet, LiteManager provides the «Connect through a server» feature. This feature allows the LiteManager Server to be used as a gateway to access servers in another network.
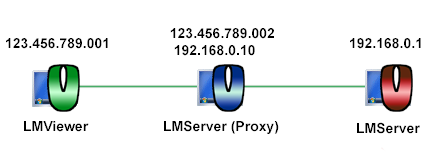
Fig. 14. Cascade connection scheme.
1. Let’s add two connections in the client module: the first to an intermediate server, and the second to the terminal server which is to be operated.
2. In the settings of the terminal server in the «Network and operating modes» tab, check the «Connect through a server» checkbox and choose an intermediate sever from the list. Save the settings.
3. Now you can connect to the desired server, first gaining authorization on the intermediate server.
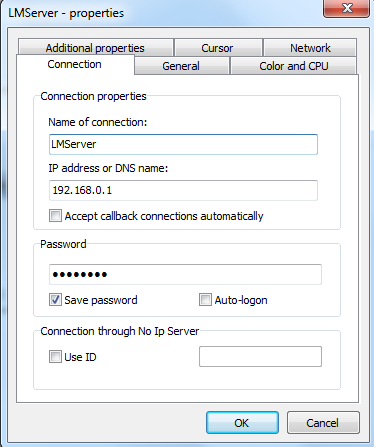
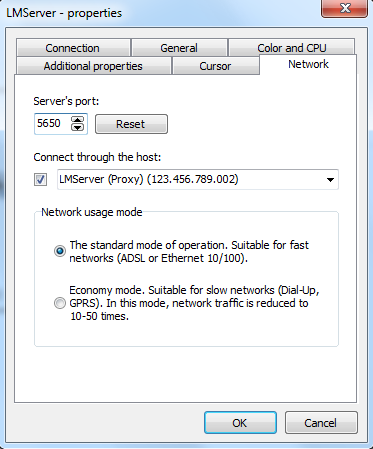
Fig. 15. Cascade server configuration.
We have considered the basic solutions implemented in LiteManager to work in complex networks. They significantly facilitate the work and sometimes provide the opportunity to remotely connect to computers that could not be accessed previously.
5. Additional features of LiteManager: remote installation, built-in search, and command line parameters.
In this lesson, we’ll consider the additional features of LiteManager, starting with remote installation of the program’s server module. When you need to install the program on a large number of computers, remote installation saves a lot of your time and effort. To install the program, you need to know the username and the password of the administrator of the remote computer, and the password should not be void.
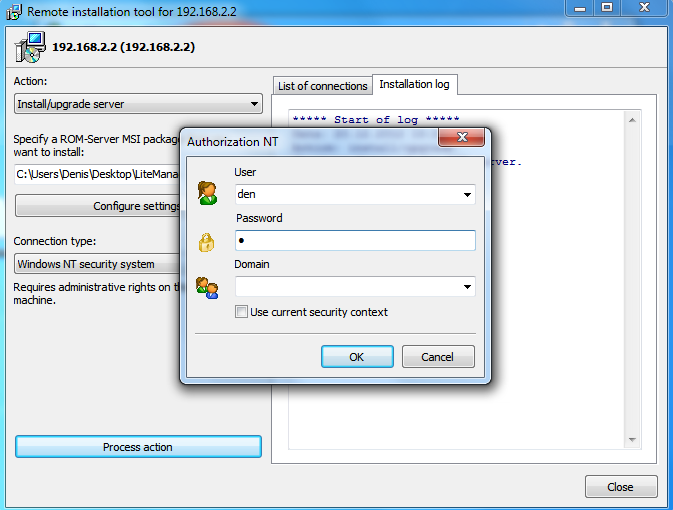
Fig. 16. Remote installation.
1. Add a new connection to the computer, on which you need to remotely install the server module, to the new connections list. To do this, choose «Remote installation / removal / launch …» from the connection context menu.
2. In the newly opening window of the remote installation, specify the path to the installation package of the server module. You can configure it in advance, thereby setting the necessary parameters of the future server. For correct operation of the configuration program, run the Viewer with administrator rights.
3. Now we can perform the desired action. In addition to installation, we can remotely stop, restart, or delete the server.
4. In case the Windows NT Security has been selected, the dialog box for input of login and password of the remote user will appear. If the LiteManager authorization is selected, you only need to enter the access password to the server that is installed on the remote computer. In this case, the update of the installed program module will commence.
For remote installation in Windows XP, you need to disable simple file sharing on the remote computer. This can be done from the Control Panel – Folder Options – View tab. Uncheck the «Use simple file sharing» checkbox.
To quickly add computers to the list of connections, you can use the built-in network search. To do this, choose «Search ROM-servers on the network …» from the «Instruments» section of the program’s main menu.

Fig. 17. Search for computers on the network.
1. Specify a search range. You can add more than one by clicking «Add range» from the context menu or the search menu.
2. Launch the search process by clicking «Find».
3. You can choose computers from the search list and add them to the main list of connections.
The program allows you to run certain connection modes using the command line, for example «ROMViewer.exe /name:XP /fullcontrol». This command launches the remote management mode for the connection named «XP». You can find the complete list of command line options and other valuable information in the program’s help system.
Lastly, let’s consider the program’s license manager. The program exists in two versions: LiteManager Free and LiteManager Pro. You only need a license for server modules, while the client module is free. Entering the license key separately on each server is inconvenient, so you can enter the key only once in the client module of the license manager.
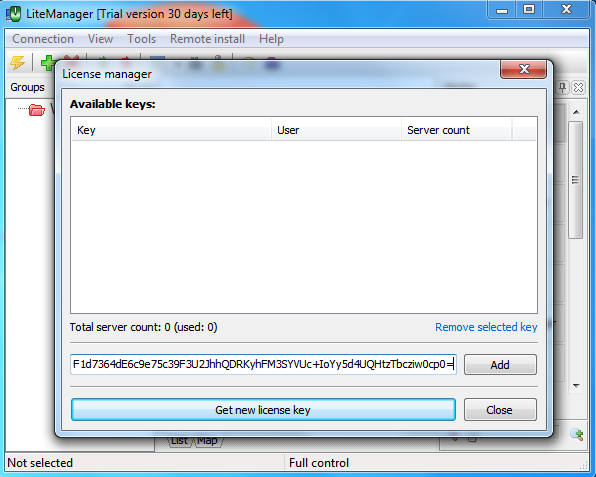
Fig. 18. License manager.
1. To open the manager, select «License management» in the Help section of the program's main menu.
2. To add a key, enter it in the field and click «Add».
3. The Free version of the program has a free key for 30 licenses. When you add a new key, this number will be increased by the number of licenses in the new key.
We’d like to note that the free version is available to both individuals and legal entities, which distinguishes the program from many other free similar solutions.
You can download the full or the free version of LiteManager or learn more information about the program from our official website.

